


Simple and functional window decor this DIY window shelf curtain rod combo is a timeless piece of decor used in my office.

We recently undertook the task of moving our entire house around. The kids moved upstairs, and we move downstairs, reclaiming the master bedroom and taking up separate office spaces.
For the last two years, hubs and I have shared an office.
And while it worked, I found myself craving to have my own space.
A space filled with feminine energy where I could create some bit of order and even find creative inspiration.
One of the things I love most about my new office is having a great amount of natural light that spills in. Because there is a big beautiful window.
As I was sitting there the other day staring out the window, my focus changed to the window itself.
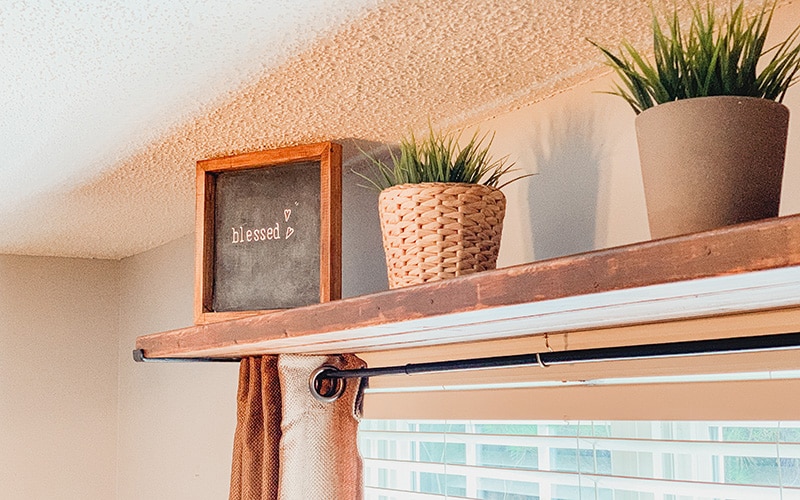
It needed drapes. And I was able to dig some up that made me excited from my stash in the attic. They’re a basketweave texture that will infuse some of that boho energy I’m feeling lately.
But I realized that wasn’t enough. I decided that I wanted to frame the window with a shelf that I could use to incorporate some cute decor and some greenery. Perfect for my goal to infuse more green into the house collectively.
That is how I came to the conclusion that I would create a DIY shelf and window bracket combo.
I went to Home Depot and grabbed some of the brackets intended for closets. I grabbed some anchors for hanging them, and a few 2*4’s to build the shelf.
Materials Needed For Window Curtain Rod Shelf
- shelf rod brackets
- Curtain rod
- Rod hooks
- 2 x 4’s
- Kreg jig
- Pocket Screws
- Stain
- Polyurethane
FAQs about The Materials
How To Make A DIY Window Shelf Curtain Rod Combo
I started by cutting the three 2×4’s to the desired width. Actually, the old man cut them. The window itself is 60 inches wide so I allowed for the shelf to be 65 inches total.

Using the Kreg jig I combined the pieces of wood to make a single shelf by creating pocket holes. I did holes, 5 inches from each end and directly in the center.


Depending on the width of your shelf, you may need more or less.
From there, I sanded it down with 180-grit sandpaper first to get rid of the stickers, stamps, and other imperfections.

I used 220 grit to finish it and make it nice and smooth.

My little dude wanted to assist so I let him. When he wants to help and he can, I try to let him. It allows us some bonding time and often some teachable moments.
Life’s about balance right?
And truth be told momma don’t mind a little help.
Once all smooth I wiped it down real good to get rid of the sawdust.
And using my favorite stain, the Varathane Early American, I stained it and topped it with some polyurethane, and was ready to install.
Installation of Shelf
To install my shelf, I installed anchors to hang my brackets.
After installing the brackets, I placed the shelf and screwed it into place with the two front holes. I left the back two holes for the bracket hooks that the curtain rod would hang from.

The hooks only came in gold. And normally, I would have spray painted them, but for some reason, I felt the need to leave them gold. I liked the detail it added.
Lastly, I hung the drapes using a curtain rod. And voila!


Isn’t it perfect?

This Window Shelf CurtainRod combo is a part of the At Home DIY project. Where the topic this month is what can I build with 2×4's Challenge. You can click here to see all the other awesome Homemade furniture and decor projects from a host of amazing blogger friends.


How To Make a Curtain Rod Shelf Combo Project
Equipment
- [Kreg jig]
- [Drill]
Materials
Instructions
- Making The Shelf
- Start by cutting the three 2×4’s to the desired width.
- Using the Kreg jig combine the pieces of wood to make a single shelf by creating pocket holes.
- Once your shelf is formed, sand it down with 180 grit sandpaper first.
- Then use 220 grit to finish it and make it nice and smooth.
- Once all smooth I blew it with air from the air compressor and wiped it down real good to get rid of the sawdust. Do whatever works for you to get rid of the sawdust as much as possible.
- Stain it with your stain color of choice.
- Top it with a coat or two of polyurethane, and it is ready to install.
- Installation of Shelf
- If not hanging directly in a stud I strongly suggest the use of anchors. Install anchors to hang the brackets.
- After installing the brackets, place the shelf and screw it into place with the two front holes. Leaving the back two holes free for the curtain rod brackets.
- Drill holes for the rod hooks, and screw them directly into the hole.
- Hang the curtains/drapes using a curtain rod. And Enjoy!
so creative
Thank you so much!
I love your project. I will be starting my windows soon. Thank you for this idea.