


A special thank you to Build.com. I was provided with a Miseno faucet & sink for this post. This is a sponsored post, and to learn more about what that means click here.

When we first looked at our house, I knew that the kitchen had the structural ability to work. But updates would be needed. So the kitchen has been my main focal point since moving into the house a year ago.
I started with new appliances. We chose the GE brand appliances in the slate fingerprint-resistant finish to alleviate the appearance of fingerprints. Because, kids…
I am largely focused on how I can have a nice house with three kids who could care less about their moms' desires to have a nice house. It’s a struggle yall…
Then I went into painting the kitchen cabinets the month after we moved in. That was a job that is not for the faint at heart. It is never fun to have the kitchen under construction for multiple days and still have to function in it. But I am glad to tell you I survived it, and have reaped the rewards of a nice, newer looking kitchen.
But there was more that still needed to be done. I absolutely hated the dark granite countertops. And after months of research, I found and decided to use the Giani Granite countertop paint to update my counters. They came out beautiful!
We took a short break and got back to work in June.
Over the last month, I have done what I thought was the project that was gonna take me out, covering the countertops in epoxy; installed a backsplash I love; now my new sink & faucet install!
I stay busy Y'all!
The kitchen is where I spend a great deal of my time. So it only makes sense that I want it to be a comfortable space I enjoy being in.
Outside of my personal enjoyment, it is the heart of my home. It is where I feed the people and entertain friends and family. I want them to feel just as good as I do in my kitchen.
Why I Chose The Miseno Brand
After learning about the Build.com Miseno brand it made perfect sense. Miseno allows you high quality and luxury without the price. Meaning you don't have to sacrifice on style either.
There were several choices for what I was looking for and I ordered without feeling like I compromised.
The experience of chatting with the reps at build.com made me feel confident in my decision.
How I Installed The New Miseno Faucet & Sink
Installation was not bad at all. My husband is not a fan of anything that has to do with plumbing. But he had no complaints, before or after installation.
We removed the connecting pipes and garbage disposal. Unhinged the faucets and old outdated spray nozzle. Using a utility knife we cut the seal in the caulk and pulled the sink out.
After doing the epoxy application to cover and seal the painted countertops we were ready to install the new sink.
Writing that, really just made the epoxy application sound like a breeze. Trust me when I say, IT. WAS. NOT!
That application felt like it was gonna end my DIY partnership with my husband, and possibly my marriage.
So glad we made it through.
Anyhoo, after we finished the counters, let them cure for 3 days, we installed the new sink.
Starting with prepping the sink to be installed.
How to Install Your New Kitchen Sink
Preparation For Installing Your Sink
- Depending on what type of sink you have there may be “knockouts” that are the holes where the actual faucet will go. You can use a regular hammer to tap those out or a hole saw bit to cut them out. Make sure you have a file handy in case u need to round a corner out.
- Get plumbers putty and turn sink upside down on saw horses if u have them, or a flat surface, and install sink drain.
- Put putty around the base of the drain along the edge of the lip that sits in the sink. Use really big pliers (they even make a tool specifically for this) to tighten the washer and locknut down until the lip is flush inside the sink.
- You will have to wipe out the excess putty when done.
- Repeat these steps for the garbage disposal while the sink is out as it makes it far less difficult than if you install after the sink is in.
Installing Your Kitchen Sink
- Sit sink in and apply a bead of caulk around the entire edge of the sink to seal, wiping any excess.
- Install faucet by aligning it with the hole(s) previously knocked out.
- Tighten the bolt under the sink until the faucet is held in place. Use silicone caulk on the spacer that goes between the faucet and the sink.
- Connect pipes and check to ensure there are no leaks.
And that my friends, is all there is to it.
My Thoughts About My Miseno Faucet & Sink
It's been a few weeks since we installed the sink and faucet, and I love it! My son does not mess with the faucet. At least not after the initial infatuation with the newness of it. Which was one of my concerns.
The sink is perfect for larger dishes and even putting the drain in the sink, instead of the counter, when washing dishes.

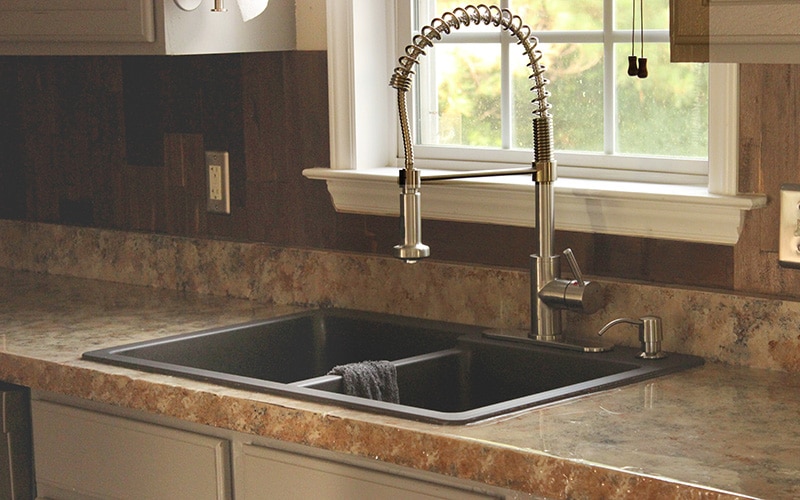
The faucet is not only super stylish and sleek, but I love the functionality with the sprayer built in.


If you are looking to do some updates in your home be sure to check out Build.com. You can check out this video here to see how you can start accumulating inspiration and narrowing down your choices.
I am in love with my new Miseno sink and faucet. It has added a new classy elegance to my little country kitchen.
I appreciate all the details you show in this product! Makes me feel like I am looking at it in person. Thank you!
Jen! you bet! I could have photographed it all day cause I love it so much. It feels like artwork in my kitchen, lol