


A simple wooden Christmas sign tutorial that creates simple, beautiful, and elegant door and/or wall decor.

It’s not quite Christmas time but it’s the perfect time to start planning for Christmas decorating.
I know some people go from Halloween to Christmas. But that’s not me. I ease into the Merry season.
I love Thanksgiving. And the holiday season in general. Family time. Festivities. Food. Lots of yummy food.
This past summer at Haven conference I won a Dremel Stylo +. I don’t get to use it nearly as much as I would like, but I am excited any time that I can.
The vibration of it is sooooo soothing and relaxing to me. Call me weird *shrugs*

I told you guys last week that there were decor ideas coming your way over the next couple weeks. If you missed it last week, there were 24 door wreath ideas that you can check out here.
This week as part of the DIY Christmas Blog Hop we are sharing wooden Christmas decor.
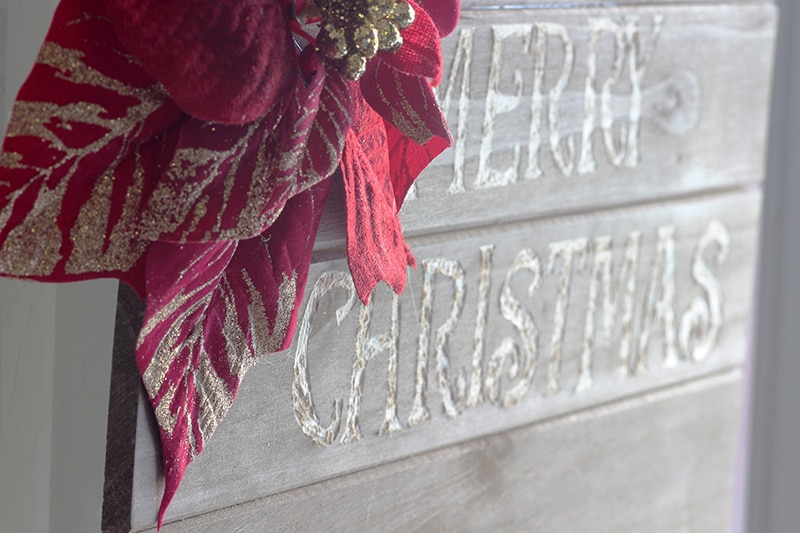
I have a Wooden DIY Merry Christmas Door sign tutorial to share with you today!
Super simple.
Super cute.
Perfect for Christmas!
To make this sign you only need 4 materials, and about an hour out the day. You really can’t beat that.
And if you are like me, it counts as therapy without the copay. WIN!
How To Make A Simple Wooden Christmas Sign
Prepare your stencil(s). Do this by aligning it in the desired position. If using individual letters plan them out to ensure proper placement and spacing.

Then tape your stencil in place, so that it does not move while you are etching it out. I used painters tape because it is just sticky enough to hold it in place, but not enough to leave sticky residue behind. And I could reuse the pieces for several of the stencils before I had to get more.


Using your Dremel and the .08 etching attachment, etch out your letters.
Once your letters are completely etched determine the placement of flowers.

Using your glue gun, glue flower(s) in place starting with under the center and then under any petals to help it stay in place. I took the center piece that I pulled them stem out of and glued it in between the pallets to help it stay in place. Then glue a few of the petals down as well.

And that’s it! A Simple, easy, beautiful Christmas sign that can be used on your door or indoors on a wall.

How To Make Wooden Christmas Sign Project
Equipment
- [Dremel Stylo Plus]
- [Glue gun]
- [Glue Sticks]
Materials
- 17 x 11” wooden plaque
- Stencil, s
- Tape
- Flower, s
Instructions
- Prepare your stencil(s) by aligning it in the desired position.
- Tape your stencil(s) in place, so that it does not move while you are etching it out.
- Using your Dremel and the .08 etching attachment, etch out your letters.
- Once your letters are completely etched determine the placement of flowers.
- Using your glue gun, glue flower(s) in place starting with under the center and then under any petals to help it stay in place.
Notes
- For sticking letters. I used painters tape because it is just sticky enough to hold it in place, but not enough to leave sticky residue behind. And I could reuse the pieces for several of the stencils before I had to get more.
- For gluing flowers. I took the center piece that I pulled them stem out of and glued it in between the pallets to help it stay in place. Then glue a few of the petals down as well.
I love the texture the dremel gives the sign! It looks so pretty!
Thank you Betsy!!! I am all about texture! lol